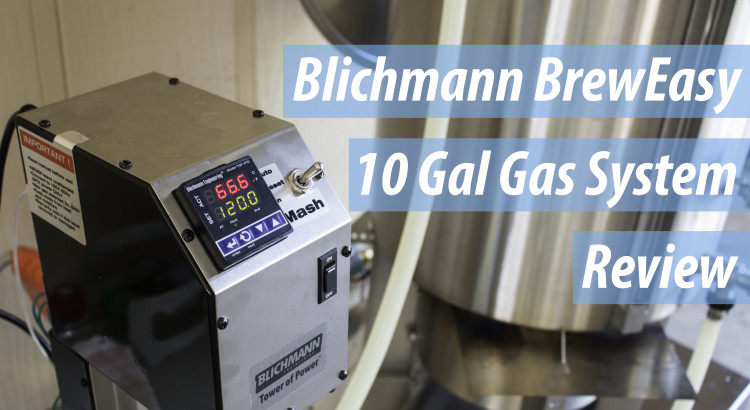
In this post, I am going to discuss my 10 gallon gas fired Blichmann BrewEasy Turnkey system. You are probably wondering why and the hell I even bought it. Well, I’ve been looking to upgrade my brew system to something more automated for some time now. Nailing my mash temperatures has something I’ve always kind of struggled with. I’m always within about two degrees, but I wanted more control and I wanted to be able to do step mashes as well.
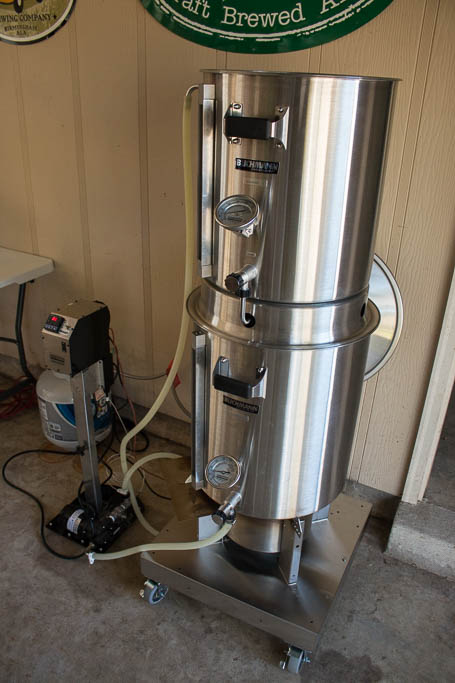
My decision to buy the BrewEasy is based primarily on how lazy I am. This also includes having to design a new system, build it, and then fix the bugs in it. So I wanted to be able to purchase something that was turnkey and would give me the control I wanted. After a lot of research, I settled on the Blichammn Breweasy. The biggest struggle I had when choosing my system was trying to decide on going electric or propane. I choose to go with propane because I like to drag my system around to brew at other locations besides my garage. This route also didn’t require me to have a 240 v GFCI circuit run out to my garage. A local electrician gave me a minor stroke when he wanted $1,600 to run the power I wanted to my garage. I decided to go with the 10 gallon system because it utilizes a 15 gallon mash tun. My previous 10 gallon mash tun was used at capacity pretty frequently, so I wanted something larger. The 15 gallon mash tun will also allow me to do very high gravity beers with 5 gallon batches. So anyway, let’s start discussing the specific components of the system.
The pH during the brewing process can be pretty important, especially if you are interested in repeatability. One of the most common applications for the use of a pH meter is during the mash. Having the mash pH in the appropriate range can greatly increase your mash efficiency. A pH meter is also very hand while brewing a sour ale, making a sour wort, or even a sour mash. A pH meter is a device that essentially measures the hydrogen concentration of a solution. The lower the pH, the more acidic the solution is.
Devices for Measuring pH
In homebrewing, there are two primary methods for measuring pH. The first method utilizes pH strips that require estimating the color of the strips after its dipped into the wort or whatever solution you want to know the pH of. These strips are not very accurate and require you interpret and extrapolate the colors on the bottle or chart that came with the strips. The color of the wort can also interfere with interpreting the color on the strip. I do not recommend these strips being used in a homebrewery.
The second method of measuring pH is using a pH meter. This is the preferred method of measuring pH. Meters can range in price from $15 to thousands of dollars. A $13 model can be found here, but reviews among the homebrewing community are that these can act a bit wonky at times. Two highly recommended pH meters in the brewing and wine making circles are the Milwaukee MW101 or MW102 pH meters. I would recommend the MW102 model because it comes with a thermometer and has built in automatic temperature compensation (ATC). Inexpensive pH meters require the solutions to be at room temperature before measuring the pH. Measuring the pH of a solution is temperature dependent, so having ATC is useful at elevated temperatures, like in the mash.
A third method for measuring pH has recently come to the hombrewing market. This devices has typically been reserved for laboratory. The third method is using a colorimeter or photometer system. This devices requires you to add a small amount of the liquid you wanted tested into a small chamber and then adding a small amount of reactive chemicals. The colorimeter or photometer then measures the color of the solution to determine its pH. These devices are usually very expensive, but can also perform a large range of tests beyond measuring pH. A homebrew photometer system can be picked up for about $300 from Industrial Test System. However, these systems aren’t very useful for solutions that aren’t clear, have color, or contain particulate matter, such as a wort or grist. These devices are most useful for measuring your water chemistry.
PH Meter Maintenance and Care
You will also need to purchase three (two if your pH meter only has a one-point calibration) different solutions to maintain your pH meter. The first one or two solutions you will need are called buffer solutions. These are used to calibrate your pH meter. Most pH meters will require at least a two-point calibration. Usually the pH meter will want to be calibrated with solutions with pHs at 4.0 and 7.0. Calibration buffer solutions are relatively inexpensive and will last a homebrewer a relatively long time. Carefully read the instructions that came with your meter to learn how to perform the appropriate calibration procedure. Note: The buffer solutions can also be used as a quality control check on how well your pH meter is functioning.
The third solution is for maintaining the functionality of your pH probe. The probe on a pH meter is a sensitive glass probe . The probe of a pH meter is usually constructed of a thin special glass membrane and there is a conductive fluid inside the pH probe. This probe can easily dry out if the pH probe is not kept in a storage solution. Storage solutions (usually a potassium chloride solution) are relatively inexpensive, and like the buffer solutions, should last a very long time. You don’t need much solutions at any given time. All meters will come with a method for keeping the probe submerged in the storage solution. Usually a cap or small container is filled with the storage solution and the probe screws directly into the container. You want to keep the probe moist during storage. You can use the buffer solutions in place of the storage solution if you are in a pinch. Tap water can also be used, but a normal storage solution or buffer solution would be better. Do not use distilled water as a storage solution as this could permanently damage the probe.
When you are done using your probe, it’s important to rinse the probe. Any material clinging to the probe can easily be transferred to your storage solution. Over a long period of time this could interfere with your probes functionality. I always rinse my probe immediately after using it. I rinse with tap or distilled water.
Over time, there is the possibility of the probe getting gunky. You will be sticking it in some sticky and protein rich solutions, so it’s good to give your probe a good cleaning every now and then. A dirty probe can give very slow or erratic readings. Soaking probes in new clean storage or buffer solution is sometimes enough, but sometimes you’ll need something a bit stronger to get them clean. For a deeper cleaning, procure some 0.1 M hydrochloric acid and soak the probe for about 15 minutes and rinse with water. If your probe is very dirty, you can try to soak the probe in water with a tiny bit of dish soap and then use a soft bristled toothbrush to try and brush any contaminants away. If these methods do not resolve problems with the probe, you might want to consider purchasing a new probe. Also, be sure to rinse out your storage containers occasionally.
Measuring pH
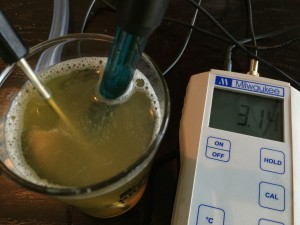
There are several times during the brewing process where knowing the pH is useful. The primary process where pH is most important is during the mash. Mash pH should range from 5.0 to 5.8 with a sweet spot of 5.2-5.4, depending on who you ask and which source you reference. To measure the mash pH, remove the probe from the storage container and stick it in the mash. If your pH meter has a separate thermometer for ATC, put it in the mash close to the pH probe. Push the tip of the probe about 2 inches below the surface of the mash. You will see the pH reading drop and eventually reach a value where the reading does not change. Most pH meters have an indicator telling the user when the pH reading has stabilized. If your probe doesn’t have a stabilization indicator, you are pretty close to stabilization when the displayed number on your pH meter hasn’t changed after about 5 seconds. Once you have measured your pH, remove the probe and immediately rinse with water and place the probe back into its storage container.
Most pH meters provide two decimal points on the readout. I never use the second decimal point. I have found that sticking with the first decimal point and rounding to the nearest 0.1 pH has been more than adequate.
The process of checking your pH anywhere else in the brewing process is the same. Place the probe in the solution your are testing, wait for it to stabilize, remove, and rinse. It’s that easy! If you are measuring post-boiled wort or beer, I would recommend removing a sample from the fermenter or keg before taking a reading. Never stick the probe into your fermenters or kegs. pH probes can be a source of cross contamination if you are not careful, so it’s better to remove a sample and measure the pH of the sample.
I hope you have enjoyed this post. If you have any questions of feel that I have missed something important, please comment below. I would love to have some feed back.
 In this post, I am going to discuss my 10 gallon gas fired Blichmann BrewEasy Turnkey system. You are probably wondering why and the hell I even bought it. Well, I’ve been looking to upgrade my brew system to something more automated for some time now. Nailing my mash temperatures has something I’ve always kind of struggled with. I’m always within about two degrees, but I wanted more control and I wanted to be able to do step mashes as well.
 The second method of measuring pH is using a pH meter. This is the preferred method of measuring pH. Meters can range in price from $15 to thousands of dollars. A $13 model can be found
 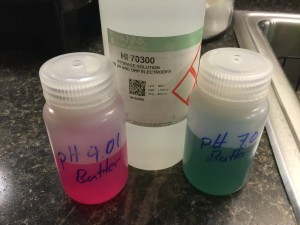 You will also need to purchase three (two if your pH meter only has a one-point calibration) different solutions to maintain your pH meter. The first one or two solutions you will need are called buffer solutions. These are used to calibrate your pH meter. Most pH meters will require at least a two-point calibration. Usually the pH meter will want to be calibrated with solutions with pHs at 4.0 and 7.0. Calibration
 rinse with water and place the probe back into its storage container.