
Happy New Year! I suppose this entry about harvesting your abundant crop should have appeared at Thanksgiving, but better late than never, and it’s never too late to give thanks. So here we go.
You’ve heard and read about it a thousand times in your books about classic brewing techniques. You often see the phrase “a true top cropping strain” when browsing the White Labs of Wyeast yeast inventories. Read an article or watch a video about British brewing and you’re almost sure to hear or see it mentioned. The famous yet elusive top cropping of yeast.
A conversation about top cropping would certainly be incomplete without mention of the famous Yorkshire square. Without going into too much detail the Yorkshire square is a fermenting vessel dating back some 200 years. Traditionally, it is a 2-story square fermenter built from Welsh slate. The top story has a walled deck with an open top. Fermentation takes place in the bottom chamber and the yeast foam pushes into the top chamber and settles onto the deck. The fermenting wort from the bottom of the chamber is pumped over the foam in the top to keep the yeast mixed in. Eventually, the pumping stops, and the beer in the bottom settles and clears. This beer undergoes further manipulation, but that is not relevant to our discussion here. Some breweries still use the old slate square fermenters, but many modern breweries have turned to stainless steel squares or even cylinders. It’s not the shape or material that is important; its the method. Several breweries use the Yorkshire square method including Samuel Smith’s, Theakston, and Black Sheep. Black Sheep explains their process on their website. Also, this guy built his own Yorkshire square with, apparently, nice results. You may have to scroll down his page to find the square. However, before you go on a slate search, remember, it is the process, not the shape or materials used that we are worried about.
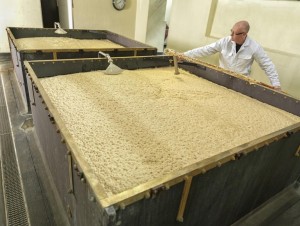
One of the advantages of using this “open fermentation” method is that the brewer can “crop” or collect yeast by removing the foam from the top of the fermenting wort, thus the name top cropping.
Before this post becomes a lesson on Yorkshire squares, let’s get to talking about harvesting yeast by top cropping. There are several methods used by homebrewers. One involves using a big blow off tube from a carboy running into a sanitized container. When the brewer fills the carboy, he or she leaves minimal head space. As the “true top cropping strain” begins to work, the foamy, yeasty head will push out through the blow off and into the container. However, this method seems a bit messy and complicated for me to mess with. I would prefer less clean up.
The method of top cropping I use is much easier in my mind to accomplish. My method is similar to the method of Arcadia Brewing except on a much smaller scale. They use buckets and trash cans with big cylindrical fermenters. I use a spoon and mason jars with an 8 gallon Ale Pale. I start by selecting a strain of yeast that lends itself to top cropping. (A list of top cropping strains appears at the end of this post.) For this post I chose to brew a best bitter using Wyeast 1469 West Yorkshire Ale. This yeast is the yeast used by the Timothy Taylor Brewery of Landlord fame.
I brewed my beer as I normally would. I’ll spare you the boring details since, I assume, if you are reading a blog post about top cropping, you probably already know how homebrewing works. I’ll stick with things relevant to top cropping
- It works best to use an 8 gallon fermenting bucket for this method.
- Pitch a normal amount of yeast into the bucket with your cooled wort. Place the bucket

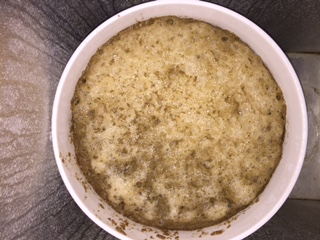
Dirty foam just before the first scraping. lid loosely in place and ferment as normal.
- 24 to 48 hours after pitch remove the lid. A “dirty” foam will have appeared on your beer. Use a sanitized spoon to remove the “dirty” parts. This will consist of hop bits and protiens that get pushed to the top by initial fermentation. Discard this foam. Reset lid loosely in place. Boil about a gallon of water and place in the fridge to cool over night.
- 72 hours after pitch reopen your bucket. At this time you should see a nice thick cleaner foam on your fermenting beer. Use a sanitized spoon to scrape this foam off and place it into sanitized mason jars. Use as many jars as you need. Use the pre-boiled
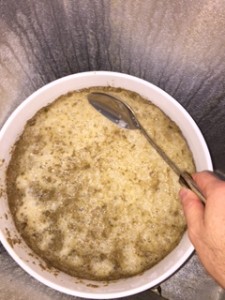
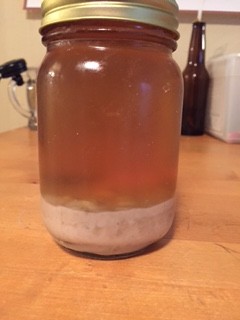
Harvest with a sanitized spoon. I know this looks a lot like the dirty pic above, but it is vastly different. I promise. cooled water to fill the mason jars full of foam. You can pour right on top of the foam. Loosely close the lids of the jars and refrigerate. Finally, completely seal your fermenter lid complete with air lock.
- A couple of hours after harvesting vent the mason jars as the yeast foam will want to off gas. Once the yeast settles, seal the jars tightly and store in the refrigerator. You should get enough yeast in each jar for a 5 gallon batch if you use it fairly quickly. If not, just make a starter and move forward.

A couple of things to remember are that you can keep harvesting from this one initial pitch for quite a while before having to buy another smack pack. Just remember to skim and harvest on the same schedule for each subsequent batch. This will keep your yeast consistent. If you harvest early, you may get cells that are quick to peter out. If you harvest too late, you will increase your chance of getting cells that have a tendency not to flocculate. So keep it on schedule, and you should have no trouble fermenting later batches. Always try to harvest from lower gravity lower hopped beers. I have heard of 8 to 10 repitches using this method. I’ll edit this post after I brew with the cropped yeast to let you know how it went.
Top Cropping Yeast Strains
Wyeast 1187 Ringwood Ale
Wyeast 1318 London Ale III
Wyeast 1469 West Yorkshire Ale
Wyeast 3068 WeihenstephanWeizen
Wyeast 3638 Bavarian Wheat
Wyeast 3944 Belgian Witbier
WLP 022 Essex Ale
WLP 038 Manchester Ale
WLP 039 East Midlands Ale
This is by no means intended to be all the strains that are good for top crop harvesting.


I appreciate the effort you made to post this information, but the way you are cropping can be improved. With a true top-cropper, the entire brown head is traditionally skimmed and discarded (the Germans refer to it as the braun hefe). The brown head contains compounds that have been scrubbed from the wort and early flocculating yeast cells, neither of which one wants in one’s crop. A second completely cream-colored yeast head should replace the skimmed brown head. The clean second head is the one from which yeast is traditionally harvested. I would recommend against storing yeast in water. It is better to store cropped yeast with some of the fermenting wort (one needs to leave the lid loose to allow CO2 to escape). Water tends to have a pH of around 7. Yeast cells protect themselves from competitors by consuming all of the dissolved oxygen in wort before lowering the pH down to around 4 and producing ethanol, which is toxic to all living things at different levels. Storing a yeast crop under green beer protects the cells from competitors.